Tuesday, 19 January 2021

vmatrix 2.5.2 berjalan dengan baik pada windows server Update 2019

 Update server 2019 :


Berjalan dengan baik dengan versi vmatrix 2.5.2


Feature yg sudah di test :


1. Perangkat USB berjalan dengan baik

2. Fungsi virtual IP berjalan degan normal

3. Storage management normal

4. User Management (Create User) perlu perubahan policy di group policy untuk dapat di gunakan.

Sunday, 12 April 2020

Enabling-vcloudpoint-zero-clients-accessing-hosts-across-network-en-rev3-25-03-20


Enabling vCloudPoint zero clients to connect over WAN

(across network)


For remote connection with vCloudPoint zero clients over WAN, setting DMZ host is the easiest way but unsafe, therefore, you can add these ports in your router instead.


Enable the vCloudPoint zero clients to access a single host over WAN:

1. Set port forwarding rules on the router. By default, the listening port uses TCP13389-13393, and each end user uses one port, and the remote desktop service port is 3389.


The following example is given on 10 users (always reserve more ports if possible). Settings may vary among routers. The following steps demonstrate the settings on
a TP-WVR1200G router.


2. On the vCloudPoint zero clients login interface, manually add the public IP
and corresponding port of the host to be logged in, for example: 219.146.73.13389.


Enable the vCloudPoint zero clients to access multiple hosts over WAN:

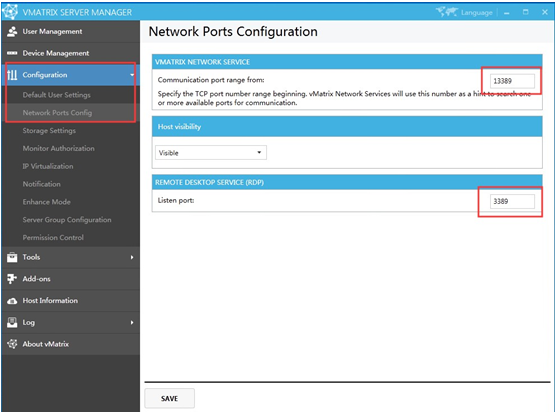
1. Open vMatrix Configuration Network Port Config, set the vMatrix Network Service ports and the Remote Desktop Service ports of each host to be different and make sure that the ports are not occupied.

For example:

Host A, network port 13389, RDP port 3389, local IP: 192.168.1.10.


Host B, network port 23389, RDP port 3390, local IP: 192.168.1.20.


2. Set port forwarding rules on the router. By default, the listening port
uses TCP13389-13393, and each end user uses one port. The following example is given on 10 users (always reserve more ports if possible). Settings may vary among routers. The following steps demonstrate the settings on a TP- WVR1200G router.


3. On the vCloudPoint zero clients login interface, manually add the public IP
and corresponding port of the host to be logged in, for example: 219.146.73.13389 and 219.146.73.23389.


Note: Due to the limited bandwidth and high latency of WAN, the desktop
performance may be significantly compromised. Please make sure the internet connection on both ends are well provisioned for delivering desirable desktop performance. It is recommended to provide a dedicated VPN network or configure a broadband network with an uplink speed of at least 10-20mpbs/user (depending on the user's specific workload) for the host.


Note:

1. requires a public IP feature on the ISP
2. Static IP features are needed if needed
3. access speed depends on the internet data speed
4. recommended data rates above / download recommended min. 2MBps / user on the host and client side
5. Using the IP port can not be used on the ISP side


Sunday, 29 December 2019

Cara Menonaktifkan Pembaruan (Update) Microsoft Office 2016


Cara Menonaktifkan Pembaruan (Update) Microsoft Office 2016

Microsoft sendiri selalu menekankan untuk melakukan pembaruan (update) untuk semua produk perangkat lunaknya (software). Sebagian software melakukan update secara otomatis, sebagian memerlukan keterlibatan atau keputusan Anda dan sebagian lainnya menyediakan opsi terkait update seperti menonaktifkan (disable) update. Sebenarnya update merupakan hal penting terkait fitur baru, perbaikan celah keamanan (bug), performa dan juga kompatibilitas.

Salah satu perangkat lunak (software) Microsoft adalah Microsoft Office Pagkage yang di dalamnya terdapat Microsoft Word, Microsoft Excel, Microsoft PowerPoint dan beberapa aplikasi Office lain dan penunjangnya. Microsoft Office Package memberikan opsi terkait dengan update. Salah satu opsi yang diberikan adalah menonaktifkan (disable) Update meskipun ini sangat tidak dianjurkan.

Namun ada saat dimana Anda perlu untuk menunda atau menonaktifkan update Microsoft Office. Sebelum melakukan update, Anda mungkin sudah mengetahui atau membaca di berbagai artikel online, forum, komunitas terkait masalah yang mungkin muncul saat melakukan update seperti perubahan tampilan atau fitur yang tidak diinginkan atau penurunan performa bisa menjadi alasan menunda atau menonaktifkan update.

Untuk menonaktifkan update Microsoft Office, selain menggunakan opsi yang tersedia di Microsoft Office, Anda juga dapat melakukan penonaktifan update melalui Windows Settings atau perangkat lunak (software) pihak ketiga. Bila Anda ingin benar-benar menonaktifkan update Microssoft Office, berikut ini adalah caranya:

1. Melalui fitur Microsoft Office.

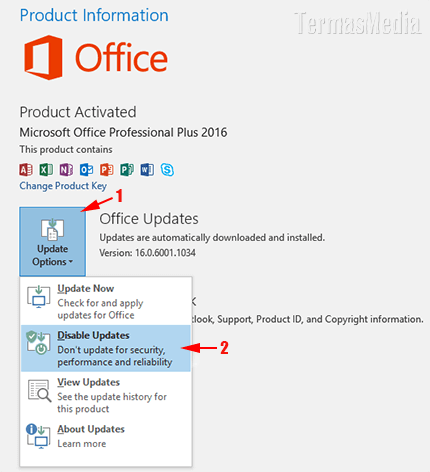
Untuk menonaktifkan (disable) pembaruan (update) melalui fitur Microsoft Office, Anda dapat menjalankan salah satu aplikasi dari Microsoft Office package, misalnya Microsoft Word, Microsoft Excel atau Microsoft PowerPoint. Di contoh ini menggunakan aplikasi Microsoft Word. Jalankan Microsoft Word, klik menu File, di backstage Microsoft Word yang muncul, pilih Account, di bagian Product Information, klik tombol Update Option (1) dan kemudian pilih Disable Updates (2).
 Cara menonaktifkan (disable) pembaruan (update) Microsoft Office


2. Melalui Windows Settings.

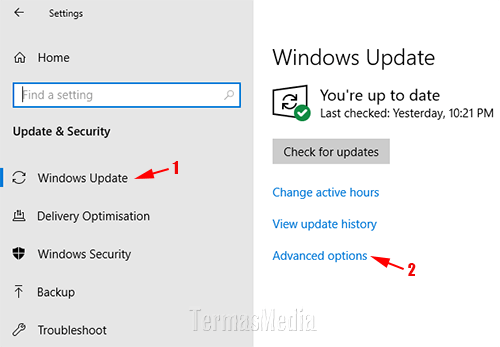
Jika Anda menggunakan Windows 10, Anda dapat menonaktifkan (disable) pembatuan (update) melalui Windows Setting. Tekan kombinasi tombol keyboard Windows+I untuk menampilkan jendela Windows Settings, dari berbagai opsi setting yang muncul, klik Update & Security (Windows Update, recovery, backup). Pastikan Anda sudah memilih tab Windows Update (1) dan kemudian klik link (tautan) Advanced options (2).
 Cara menonaktifkan (disable) pembaruan (update) Microsoft Office


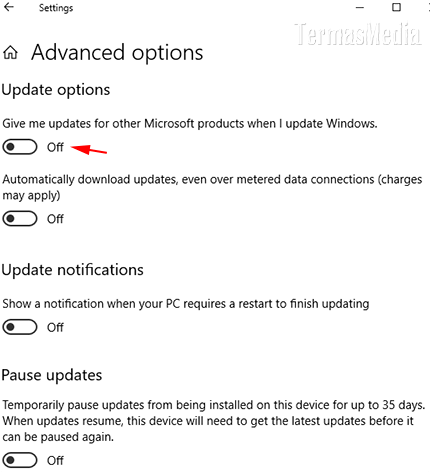
Di jendela Advanced Options yang muncul, rubah nilai toggle button Give me upadates for other Microsoft product when I update Windows dari On menjadi Off.

Cara menonaktifkan (disable) pembaruan (update) Microsoft Office


3. Melalui software pihak ketiga.

Salah satu software dari pihak ketiga yang bisa digunakan untuk menonaktifkan (disable) update Microsoft Office adalah DoNotSpy dari pXc-coding. DoNotSpy adalah aplikasi gratis (free) untuk Windows 10. Saoftware ini mengkonsolidasikan semua pengaturan privasi (privacy setting) terkait Windows 10 sehingga dapat dikelola dengan sangat mudah dan cepat. Software ini dapat diinstal di Microsoft Windows 32-bit dan 64-bit.
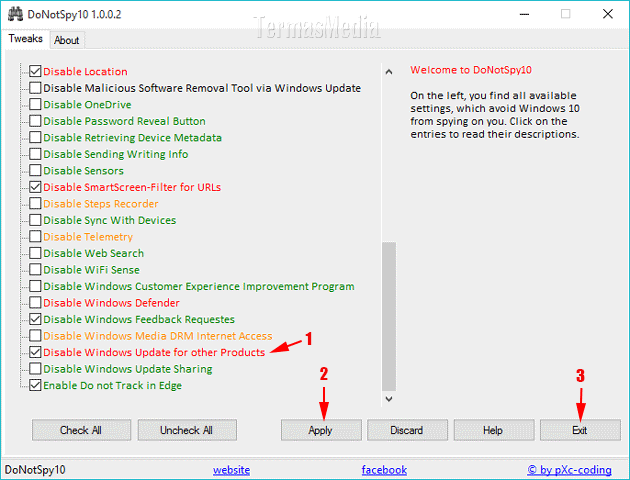
Untuk dapat menonaktifkan (disable) update Microsoft Office menggunakan software ini, unduh (download) terlebih dahulu software DoNotSpy dan kemudian pasang (install). Jika proses instalasi selesai, jalankan software DoNotSpy. Di jendela yang muncul, beri tanda centang di kotak centang (check box) Disable Windows Update for other Prosucts (1), klik tombol Apply (2) dan kemudian klik tombol Exit (3).
Cara menonaktifkan (disable) pembaruan (update) Microsoft Office


Friday, 27 December 2019

Solusi error file sharing windows 10 1709 atau yg lebih baru

solusi error file sharing windows 10 1709 atau yg lebih baru :
1. Aktifkan SMBv1 di program and feature
2. atur services :
- function discovery provider host - automatic - Start
- function discovery Resource publication - automatic - start
- UPNP Device Host - automatic - start
- function discovery Resource publication - restart
- SSDP Discovery - automatic - start

atur gpedit.msc :
- then go to Computer Configuration\Administrative Templates\network\Lanman Workstation and: "Enable insecure g

Wednesday, 23 October 2019

Cara disable autoupdate windows 10

1. Press the Windows logo key + R at the same time to invoke the Run box.
2. Type services.msc and press Enter.
3. Scroll down to "Windows Update", and double-click it.
4. "Stop" the service, In Startup type,  select "Disabled". Then click "Recovery" , in First failure, select "Take No Action". Apply and OK
5. Press the Windows logo key + R at the same time to invoke the Run box.
6. Type gpedit.msc and press Enter.
7. Computer Configuration->Administrative Templates->Windows Components->Windows Update-> double click Configure Automatic Updates-> Disabled->OK
8. Double-click Import Registry File [1.reg]
9. restart host

Download Detail and File Reg:

disable autoupdate windows 10

Tuesday, 3 September 2019

Batasi Pengguna dari Menjalankan Aplikasi Tertentu

Pembatasan Perangkat Lunak untuk Pengguna Nol Klien dengan Menggunakan Kebijakan Grup AppLocker

Deskripsi:
Kebijakan Grup AppLocker untuk sistem Windows Aplikasi dapat digunakan untuk membatasi Pengguna atau Grup Pengguna dari menjalankan dan menginstal program.
Biasanya, hanya administrator yang memiliki izin untuk menginstal program. Tetapi perangkat lunak hijau dan paket perangkat lunak lain tidak perlu memerlukan izin administrator untuk diinstal. Jadi menggunakan kebijakan Grup AppLocker dapat secara langsung membatasi Pengguna dari mengakses dan menginstal semua program.
Kiat :
  • Kebijakan Grup AppLocker perlu digunakan bersama dengan Kontrol Akun Pengguna (UAC). Silakan merujuk ke Panduan Kontrol Akun Pengguna untuk mengaktifkan UAC.
  • Sebelum mengatur AppLocker, silakan standarisasi jalur instalasi program, pastikan untuk menginstal program yang diperlukan di jalur C: \ Program Files atau C: \ Program Files (x86). Folder Program Files adalah sejenis file sistem, yang memerlukan izin administrator untuk membuat perubahan.
  • Sistem operasi yang disarankan: Windows 7 (Ultimate, Enterprise), Windows 8.1 Enterprise, Windows 10 (Professional, Enterprise), Server 2008R2 Standard, Datacenter, Server 2012R2 (Standard, Datacenter), Server 2016 (Standard, Datacenter).
Langkah Konfigurasi Cepat:
  • Masuk ke Layanan, atur jenis startup Identitas Aplikasi ke otomatis
  • Masukkan Editor Kebijakan Grup àAppLocker lokal
  • Aturan yang dapat dijalankanà Aturan penginstalan Windows dan spesifikasi skrip membuat aturan default
  • AppLocker membuka aturan Konfigurasi
  • Mulai ulang host, Kemudian pengaturan AppLocker akan berlaku.

vmatrix 2.5.2 berjalan dengan baik pada windows server Update 2019

 Update server 2019 : Berjalan dengan baik dengan versi vmatrix 2.5.2 Feature yg sudah di test : 1. Perangkat USB berjalan dengan baik 2. Fu...